How to Make an Electric Guitar Neck
Difficulty: Intermediate
10-Step Electric Guitar Neck
Beginning you need a nice slice of forest, wide enough to fit the widest function of your neck. The thickness tin vary but I ordinarily have a piece of 20mm thick. I usually use fretboard woods of 6mm.
Step one: The virtually important thing to begin with is shaving the surfaces of the piece of woods to get perfectly flat surfaces. At present shave the sides of the woods to get perfect 90° degree edge. This is important if you're going to use the sides equally a guide for a router.
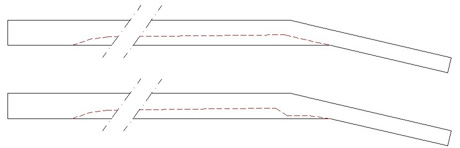
Step ii: Draw a line on the sides of the forest under the angle y'all desire for your headstock I commonly accept thirteen° like a Gibson. Now cutting the forest in two pieces on this line and do this every bit straight as possible.

Step three: Marshal the two pieces similar the picture show below then you can shave the tilted surface of both pieces. If you do information technology like this you can salvage time by shaving both pieces at the same time. Shave downward with the grain!

Step 4: If both surfaces are perfectly flat, then glue the pieces together similar the pictures below. The more you motility the trivial piece, the thicker or thinner your headstock gets. I like my headstocks pretty thick for the stiffness, so I make them 16 to 17mm. Shave the excess woods off the headstock.

Stride 5: Now you can saw or rasp the shape of your cervix out of the large piece. You tin can but make a cervix volute if you used a thick piece of wood!
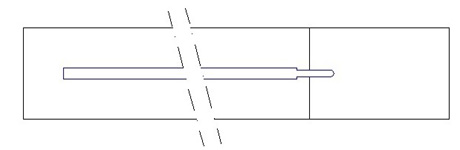
Step 6: I like to apply the truss rods with the small ends, unlike the large bullet truss rod like a 70's Fender. Because of the pocket-size end you can keep more wood, and that is important if you want to use a top lock with screws which get through the neck. The more wood you take, the more stable the screws. In case of a summit lock, I motion the truss rod a fleck dorsum from the lock. From in that location I route a narrower aqueduct for the truss rod aligning tool or Allen-wrench. So just measure your rod, and road the aqueduct out of the forest with the exact dimensions.
Step 7: Identify the fretboard forest over the neck wood. I e'er similar to use a longer piece of fret board than the neck, because I'm never sure if it's going to be a 22 or 24 fret neck. (as shown below)
Drill a hole through the fret lath into the cervix on the exact places where the 1st and 15th fret will come. Not in the center of course, otherwise yous'll drill into the truss rod .
Make sure you accept 2 drill bits of the same diameter as the hole you just drilled. At present mucilage the fretboard to the cervix (don't forget the truss rod), and keep the fretboard in place past putting the drill bits into the drilled holes. After gluing yous can take them out again. I utilize the inner tube of a cycle tire to wrap around the neck tightly to printing the fretboard to the neck while drying, but you lot could utilise wood clamps.

Step 8: Now cutting out the cervix and head stock shape you want. But use a bandsaw or other shaping saw. If you want you can already drill the holes for the tuners.

Step 9: Onto the slots for the frets and fretboard radius. There are lots of fret calculators on the Internet to calculate any fret distance for whatever neck calibration. Summate the scale you want, and draw lines on the fret lath where the frets must come, and utilise a fret slotting saw to saw the slots. Be very careful and saw straight, or intonation will exist a problem! A fret slotting saw automatically saws the right depth, so don't worry to cut your fretboard in one-half.
Now you can radius the top of the fret board Merely choose a radius you lot like, for instance a fender radius is smaller than a Gibson radius. Take a slice of paper-thin or plastic and describe the radius on it. Cut out the radius so you get a shape similar the picture below. At present sand the fret board to friction match the radius on the template you just made. With different templates you lot tin can create a chemical compound radius neck.

Step 10: Concluding but not to the lowest degree, the dorsum of the cervix. Get-go rasping the neck on unlike angles from outside to centre of the cervix. Look at the pictures below. For this job you tin also create a template to check the radius.

After rasping all the angles out of the neck, you lot take to smooth the edges with a metallic scraper. Subsequently that utilize some sanding paper to end the neck.
Now the neck is set up for inlays and frets....

x-Pace Electrical Guitar Cervix by ProjectGuitar.com is licensed under a Creative Commons Attribution-NonCommercial-ShareAlike 4.0 International License.
You are free to:
- Adapt — remix, transform, and build upon the cloth
Under the following terms:
-
Attribution —You must requite appropriate credit, provide a link to the license, and indicate if changes were fabricated. Y'all may exercise so in whatever reasonable manner, simply not in any mode that suggests the licensor endorses you lot or your use.
-
NonCommercial — You may not use the cloth for commercial purposes.
-
ShareAlike — If you remix, transform, or build upon the material, you must distribute your contributions under the same license as the original.
- No boosted restrictions — You may non utilise legal terms or technological measures that legally restrict others from doing annihilation the license permits.
Written report Tutorial
How to Make an Electric Guitar Neck
Posted by: aliviadaily7blogs.blogspot.com
0 comments